Saturday, May 31, 2014

Budget Friendly Dinner Series - Goulash

Have you ever noticed how comfort foods are always southern foods?  You don't see someone asking for lobster rolls or clam chowder or some sort of salad with green goddess dressing.  No.  They want fried chicken, chicken fried steak and mashed potatoes, or your grandma's vegetable soup.  My definition of comfort food is my mom's spaghetti and my late grandmother's boiled potatoes.  I know it sounds strange to say some plain boiled potatoes are a comfort food.  But I'll tell you, nobody, and I mean NOBODY, could make boiled potatoes like my grandma. When I was little and we would visit my mom's parents on Sundays, we always had a big spread of food and it was pretty much a rule that my grandma would make boiled potatoes.  They were my favorite things EVER.  It didn't matter what else was on the table, I was diving in to the potatoes.  And they had usually just come out of the ground only a matter of hours beforehand.  I can plainly remember walking out to the garden with my grandpa, saying "hello" to his dog, Prince, and pulling potatoes straight from the ground for lunch.  My grandmother has since passed away, and with her, the way to make those potatoes.  My mom and my aunt have tried to replicate her recipe but they've never come close.  So, grandma, if you're reading this, I expect a giant pot of boiled potatoes waiting for me whenever I pass through those Pearly Gates!!

To me, this recipe is one of those foods that can be considered a comfort food - tomatoes, beef, and noodles all coming together in a large pot.  Top it with cheese and you've got yourself a meal that will make you feel good when you're sick or better when you've had a bad day.  The other nice thing about this?  If you are a family of two (like me and the husband), this recipe will last you for a dinner and a couple of lunches too.  Its easily doubled for a family of four!

Note:  Because the beef is cooked and not drained, I really recommend that you use 93/7 ground beef so that you can keep the grease to a minimum.

Goulash
adapted slightly from Y'all Come Eat

1 1/2 lb. Ground Beef (93/7 preferred)
1 Large Onion, finely chopped
14.5 oz. can Petite Diced Tomatoes
15 oz. can Tomato Sauce
2 Tbsp. Worcestershire Sauce
2 tsp. Italian Seasoning
1 tsp. Garlic Powder
1 c. Elbow Macaroni

In a large, heavy bottomed pot, cook your onion and ground beef together over medium-high heat until the beef is no longer pink and the onions are soft.
DO NOT DRAIN.
Add in all of your other ingredients except for the macaroni.
Bring to a boil then reduce the heat and simmer, covered, for 20 minutes.
Stir in the macaroni and cook for an additional 20 minutes.
Let the goulash stand for 10 to 15 minutes before serving.
(We like to top it with some cheddar cheese!)


Thursday, May 8, 2014

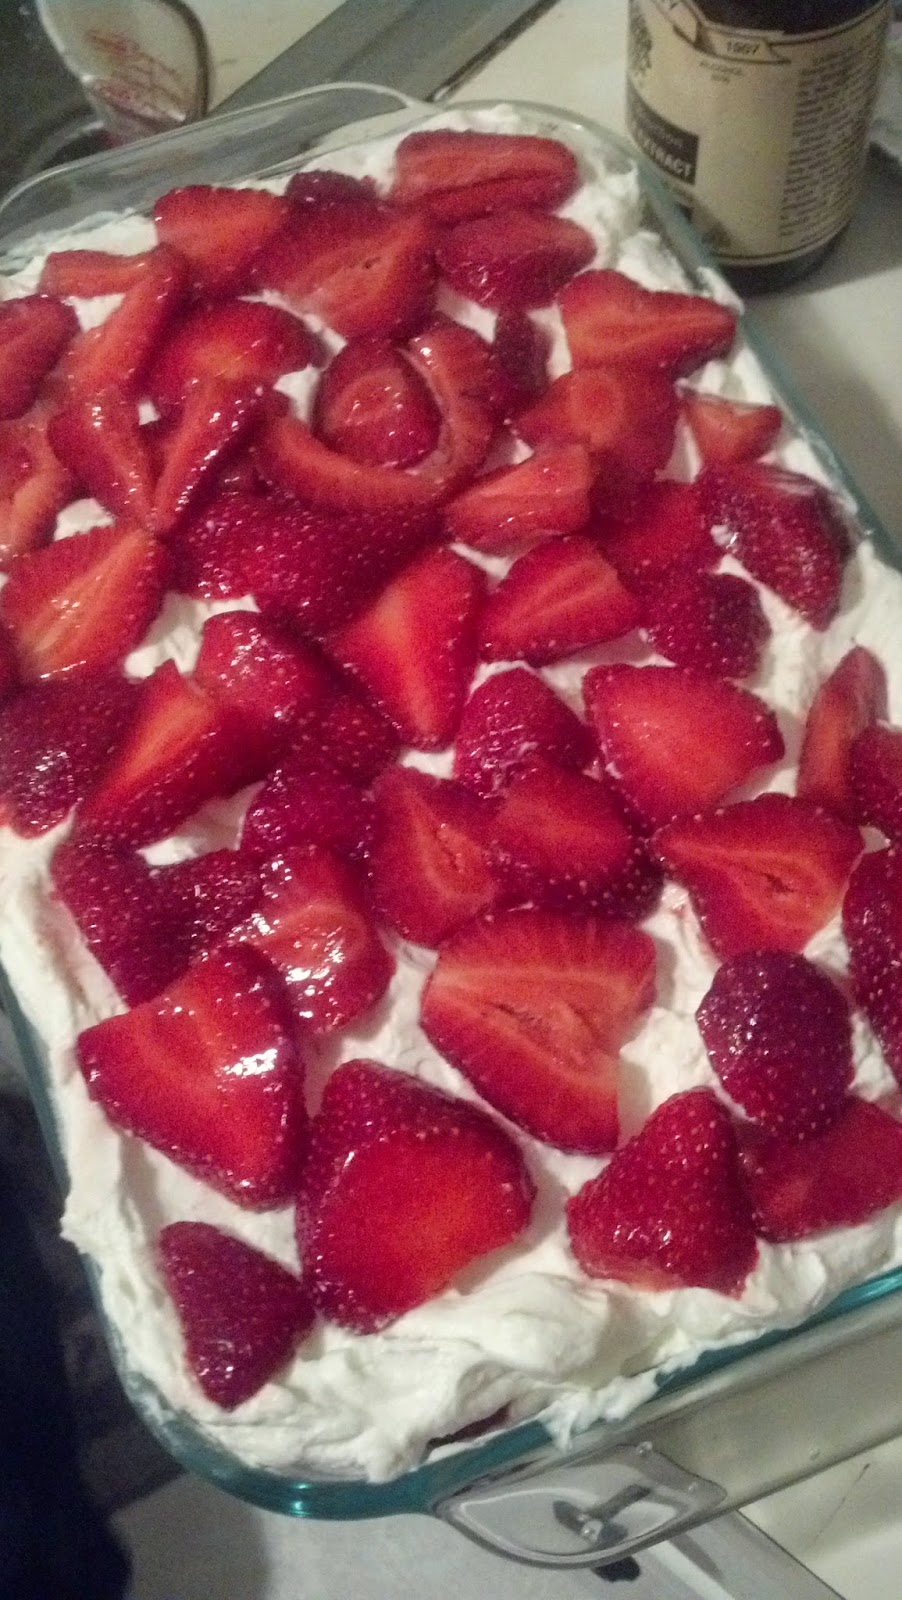
Strawberry Icebox Dessert

Let's talk about strawberries for a moment.  Just a minute.  Could there possibly be anything bad about a strawberry?  They are sweet no matter how you eat them.  They're special - the only fruit to have its seeds on the outside.  (Didn't know that, did ya?)  Dogs can eat them.  Speaking of dogs.....

This is Bella.  She belongs to my best friend.  And she loves fruit better than any dog I have ever seen.  So when I was cutting up the strawberries for this dessert, this is the look I got.
If anyone has a Dachshund, you will understand what this stare is.  It's constant and unblinking (almost).  You feel the tingles along the back of your neck and you know, you just KNOW, that when you turn around, those big brown eyes are going to be on you.  The entire time I was cutting up those strawberries for this dessert, I felt her eyes on me.  The ENTIRE time.  And Bella knows I'm a pushover when it comes to dogs.  Always have been, always will be.  If you're a pushover for a dog, they will know it and they will exploit it.  So it should come as no surprise to anyone that this dog totally got to be the taste tester for the strawberries we had.

This recipe is absolutely PERFECT for a summertime get-together.  There is no baking involved so no need to make your kitchen even hotter in the summertime. The combination of the cold whipped cream cheese with the fresh strawberries is utter perfection.  However, that being said, this recipe only lasts for around two days in the fridge before the graham crackers start becoming... well, not-so-good. They turn to mush and that's just not appealing to anyone.  So if you're having a picnic or family reunion and want to show off a dessert that looks and tastes like you put a lot more effort into it than you actual did, this is the recipe for you!

Strawberry Icebox Dessert
adapted slightly from Taste of the South magazine

8 oz. block Cream Cheese, softened (full fat
3/4 c. Powdered/Confectioners' Sugar
2 1/2 c. Heavy Whipping Cream
1 tsp. Vanilla
15 sheets Honey Graham Crackers
4 c. Fresh Strawberries, sliced

Beat cream cheese and powdered sugar at medium speed with an electric mixer in a large bowl until smooth.
Add in your cream and vanilla.
Beat a high speed until stiff peaks form.  (What are stiff peaks?  Stiff peaks happen when you lift your mixer's beaters out of the cream mixture and it forms a peak that doesn't fall over.  Need a visual?  Here ya go.)
In the bottom of an 11x7 inch baking dish, spread 1/2 cup of the whipping cream blend.
Place 5 of the graham cracker sheets along the bottom of the baking dish (you'll have four go the long way and then you'll break up the final one to fit along the tops).
Take one-third of the REMAINING cream mixture and spread along the graham crackers.
Top with 1 1/3 c. strawberries.
Repeat with the final two layers of graham crackers - whipped cream - strawberries.
NOTE:  Press gently after placing the graham crackers on the strawberries.  It will help fit the whole thing in your 11x7 pan because you won't believe three layers will fit!
Refrigerate for one to six hours.
Eat and enjoy!


Tuesday, May 6, 2014

Budget Friendly Dinner Series - Easy Cottage Pie

It's been quite some time since I've posted on this blog :(  Bad Jamie.  Things on the homefront got a bit stressful and chaotic since my last post and I just couldn't get around to it.  I'll try to do better in the future.

I'm a big fan of pretty much anything British.  I love British television (it's just so much better quality - I mean, have you SEEN Downton Abbey?) and I love, LOVE British accents.  (I've always told my husband that he'd never have a problem with me staying married to him unless we went to England because the accents would probably make me want to run off with the first British bloke I came across... or Scottish.  I have a soft spot for David Tennant a.k.a. the Tenth Doctor on Doctor Who.)  I also love their history and sense of duty.  Their countryside is to die for.  And let's not forget about the Royal Family.  (Prince George is just too adorable for words.)

One of the things I also have a love for is recipes from other countries.  I have a British bread baking book and I love exploring food blogs where they talk about how this recipe came from their Danish grandmother or how a food helped a family make it through the Great Depression.  Food history is just amazing to me!  So needless to say, me finding some British recipes to try at home was not a big stretch.  This recipe is often referred to as Shepherd's Pie because it is traditionally made using lamb.  Well, anyone who knows me knows that I don't eat lamb (or veal for that matter) so I make mine using hamburger.  According to the Brits, what I make has a name - Cottage Pie.  And this recipe?  You can bet its a staple in Hoad Cottage :)

Cottage Pie
adapted from Kraft Food and Family

1 lb. Ground Beef (I use 93/7)
2 c. Mashed Potatoes*
1/2 c. Cheddar Cheese
Frozen Vegetables (I use corn and green peas but feel free to use a preselect frozen vegetable mixture.  If using a mixture with carrots, thaw first.)
12 oz. jar Beef Gravy (I use Heinz)

* - I usually whip up a 4 portion serving of mashed potatoes using instant potato flakes in my microwave.  It makes the perfect amount for the topping.

Preheat the oven to 375.
Brown and drain the hamburger.
Make the mashed potatoes in your microwave, according the package directions.
Wipe out the remaining grease from your pan and return your drained beef to it.
Add in your frozen vegetables - use as much or as little as you like but don't exceed four cups of veggies!
Now mix in the gravy.
Pour the beef mixture into an 8x8 pan.
Cover the beef with mashed potatoes.  (Don't worry about making it look pretty.  Rustic is good!)
Top your potatoes with shredded cheese.
Bake for 20 minutes.


okay, it's not pretty but it sure does taste good!

Thursday, February 13, 2014

Gooey Butter Cookies

One of my biggest things lately is limiting preservatives and trying to make as much as possible from scratch.  Which usually always works out well unless I have a migraine and develop a sudden need for chocolate.  In that case, making it into the kitchen just doesn't happen.  Or when I'm really busy and I promised my husband that I'd make him muffins and.... yeah, sometimes it doesn't always work.  And then there are times like these.  Where using a simple, basic cake mix will make my life a million times easier and produce a cookie that is almost too good to be true.  And this cookie is.

My pumpkin gooey butter cake is a staple at my Thanksgiving table.  I've been told that if I show up without it, I will be turned away at the door.  But I don't like too many pumpkin things.  I know that it can be made without the pumpkin but the cake itself is so rich and decadent that Ryan and I couldn't possibly make just one for us.  Then I came across this recipe for a COOKIE version of this cake.  It was like the angels sang and the heavens opened... or that could've just been the clouds moving out of the way.  We're going to pretend that it was a mystical experience and that the entire universe wanted me to make these cookies.  So I did.  And they are some of the quickest and easiest cookies in the world to make - certainly pretty enough to be served to guests or when you sneak in a midnight glass of milk and a cookie.

Note:  This recipe calls for UNSALTED butter.  I have made this recipe twice, once with salted and once with unsalted butter.  And it does make a difference. When you make this with the salted butter, all you taste is salt.  When I made it with the unsalted butter, all you tasted was sweet perfection.

Gooey Butter Cookies
modified from Confessions of a Cookbook Queen

1 box Vanilla Cake Mix
1 - 8 oz. block Cream Cheese, room temp
1/2 c. Butter, UNSALTED, softened
1 Egg
Powdered Sugar

In a stand mixer, combine your butter and cream cheese.
Add in your egg and mix together.
Slowly add in you cake mix and mix thoroughly.  (Your batter will be THICK.)
Place in the fridge for around 30 minutes, just to firm up the batter.
Preheat oven to 350.
Put some powdered sugar in a bowl.
Using a tablespoon, scoop out some batter and roll it into a circle and then roll it in your powdered sugar.
Place on a cookie sheet, around an inch apart.
Bake for 8 to 10 minutes or until the cookies are set (they're going to seem underdone and that's okay).
Cool on a wire rack.
Eat and enjoy!!

Thursday, January 23, 2014

Budget Friendly Dinner Series - Skillet Tamale Pie

So two weeks ago, this happened:


I burnt my hand.  Badly.  I had second degree burns over pretty much half of my hand.  The other half had minor, first degree burns.  How did this happen?  One this particular night, I was making pork chops and roasted apples.  Roasting involves.... the oven.  So in a stainless steel skillet, I had my apples.  I threw on an oven mitt and pulled the skillet out of the oven and put it on the stove.  While finishing my pork chops, I needed to move the skillet.  And I grabbed the skillet. The same skillet that just come out of a 400 degree oven just a few minutes before.  Needless to say, I let go rather quickly.  So I ended up in the emergency room because I was in so much pain (I had second degree burns!!).  The nurse who took my vitals saw me clutching a washcloth-covered bag of ice and said, "You have a burn.  You don't need to be using ice on your hand."  I told her, "Look, this ice is the only thing keeping me from crying in pain.  I'm keeping the ice."  We have still yet to figure out how my ring finger and thumb escaped being burnt.  I had to keep my hand wrapped like this for over a week due to the blisters on my hand.  Typing and writing was... difficult to say the least.  And cooking was really out of the question because, of course, I burnt my right hand which is my dominant hand.  Ryan and I like to joke that my pork chops and roasted apples is the most expensive meal we've ever eaten at home! :)

So I was out of commission for quite some time.  Once I was able to start cooking again, I had this craving for a tamale pie that I'd made once before.  I only had to find the recipe.  If you know me well enough, you know I have a great many cookbooks.  As in - A LOT.  I knew I had this recipe, I just wasn't sure where it was.  After quite a bit of time looking, I finally found it!  One of the things I love about this recipe is how versatile it is.  If you want to add more veggies, you can. Or if you have picky eaters who don't want a lot of veggies, you can add and subtract as you see fit.  It's super easy and very easy on the wallet!

Skillet Tamale Pie
adapted slightly from America's Test Kitchen Healthy Family Cookbook

Filling
2 tsp. Canola Oil
1 Onion, minced
1 Red Bell Pepper, chopped fine
2 Tbsp. Chili Powder
2 Garlic Cloves, minced
1 lb. 93/7 Ground Beef
1 15-oz. can Black Beans, rinsed
1 14.5-oz. can Petite Diced Tomatoes, drained
3/4 c. Frozen Corn
1 c. Shredded Cheddar Cheese

Topping
1 Box Jiffy Mix
1 Egg
1/3 c. Milk

Preheat oven to 450.
Heat the oil in an 12 inch ovenproof skillet to medium heat and add onion, bell pepper, and chili powder and cook until the onion is softened and the bell pepper is cooked through.
Stir in the garlic and cook for 30 seconds.
Mix in the ground beef, beans, tomatoes, and corn and cook until the beef is no longer pink.
Drain and add back into the pan.
Add in the cheddar cheese and cover while you make the topping.
In a bowl, mix together all the ingredients for the topping (so hard, right?).
Using a rubber spatula, spread the corn muffin topping over as much of the beef mixture as you can (it's not going to be perfect - just says it's "rustic"!).
Bake for 15 to 20 minutes or until the center of the topping is golden brown and cooked through.
Allow to cool for 10 minutes before serving.
Enjoy!!


Monday, December 30, 2013

The Great Food Blogger Cookie Swap - Part 2

The Great Food Blogger Cookie Swap 2013

This year's food blogger cookie swap was amazing!  We partnered up with four different companies - OXO, Dixie Crystals Sugar, Grandma's Molasses, and Gold Medal Flour, all of whom matched our contributions - to donate money to Cookies for Kids Cancer and we raised over $13K!!  Can you believe that?  And this was from each blogger submitting only $4 each.  All because of cookies!  Cookies and a good cause?  You can't get much better than that!

My matches to receive cookies were:
The Cake Merchant
Kelly and Austin
Babcakes Bakery

I really hope everyone enjoyed the Apple Snickerdoodles I sent them!

And the folks who sent me some seriously good cookies were:
Chocolate Snickerdoodles from Sweet Lavender Bake Shop
how friggin CUTE are these packages??  
These were my favorite.  I mean - chocolate.  How can you go wrong?

Speculoo Buttons from She Runs, She Eats
These were so yummy!  Like a super-sweet gingersnaps.  I'm not the biggest fan of ginger flavors but I gobbled these up!

White Chocolate Dipped Gingersnaps from Julie's Eats and Treats
These were my husband's favorite.  He is a huge fan of gingersnaps so he was excited when we opened this box!

A big THANK YOU to Julie from The Little Kitchen and Lindsay from Love and Olive Oil for hosting the cookie swap again this year and we'll see you next year!

Wednesday, December 11, 2013

The Great Food Blogger Cookie Swap - Apple Snickerdoodles

It's that time of year again!  Time fooooooooooooooor...........
The Great Food Blogger Cookie Swap 2013

Yes!  Woohoo!  (Pardon me while I do my happy dance with my cookies.)  I send out three sets of delicious cookies and I receive three different sets of cookies!  I knew very early on this year that THESE cookies were the ones I was going to send off.  They were so different and yet so... homey.  Everyone loves snickerdoodles.  Most people love apples.  How no one managed to combine these together until now is beyond me.  I even neglected posting this recipe countless times because if I did, that meant I couldn't send off these cookies.  And we couldn't have that, now could we?  I really hope that everyone I sent these cookies to enjoyed them as much as I did!  (And my husband, who requested me to make a second batch for himself because the batch I made to send off made exactly 36 cookies.)

Note:  This recipe requires you to use boiled cider (available here).  It is absolutely one of my favorite ingredients ever!  It allows you to give a hint of apple flavor to your baked goods without actually having apples in them.

Apple Snickerdoodles
adapted slightly from King Arthur Flour’s Baking Sheet

Cookies:
¾ c. Vegetable Shortening
¼ c. (½ stick) Unsalted Butter, softened
1 ½ c. Sugar
1 Egg (large)
¼ c. Boiled Cider
2 tsp. Baking Powder
½ tsp. Salt
2 ¾ c. All Purpose Flour

Spiced Sugar Coating:
2 tsp. Baking Spice
½ c. Sugar

Preheat the oven to 400 degrees.
In a small bowl, mix both ingredients of your sugar coating and set aside.
Using a stand mixer, beat the shortening, butter, and sugar together until smooth.
Add in your egg, beating until smooth.
Mix in the boiled cider, baking powder, and salt.
Finally, add in your flour, mixing until combined.  (This batter is THICK!)
Using a tablespoon of dough, round the dough with your hands and then coat in your spiced sugar mixture.
Place them on a non-stick cookie sheet (or one that’s covered in parchment), leaving around 1 ½” between them.
Dip the bottom of a glass in the spiced sugar mixture and press each cookie down gently until they are around ½” thick.
Bake for 9 to 11 minutes or until lightly golden.
Allow them to cool on a rack.
Eat and Enjoy!!